.png?width=500&height=91&name=CG-Logo-Blue%20(1).png)
Cybersource Unified Checkout is a payment gateway option in CampusGroups (CG). Connecting it takes two systems: you set the gateway and merchant details in CG, then exchange a signing certificate with the Cybersource Business Center. Until that certificate is active, CG cannot process payments on the environment you're configuring.
This article uses numbered steps because the order matters — several steps depend on the one before them.
Who can do this: Platform admins. You also need an account in the Cybersource Business Center with permission to generate keys.
Before you begin
Have these ready:
- Your Cybersource Merchant ID. You'll find it in the Cybersource Business Center.
- Business Center access for the right environment. The test server and the production server are separate logins.
- A decision about which environment you're configuring. CG uses a different gateway value for each:
| Environment | Payment gateway value |
|---|---|
| Production | cybersource-uc |
| Cybersource sandbox / test | cybersource-uc-test |
⚠️ Caution: The Payment gateway field is free text, not a dropdown. Type the value exactly as shown above — a typo leaves payments unprocessable with no warning.
Setting the payment gateway
Click Admin in the top navigation, then Settings > General Settings in the left menu, and open the Money & Finance tab.
.png?width=670&height=324&name=Zight%202026-9-22%20at%202.53.09%20PM%20(1).png)
Now set Payment gateway to cybersource-uc (or cybersource-uc-test) and click Save at the bottom of the page. Saving is what reveals the configuration link in the next step.
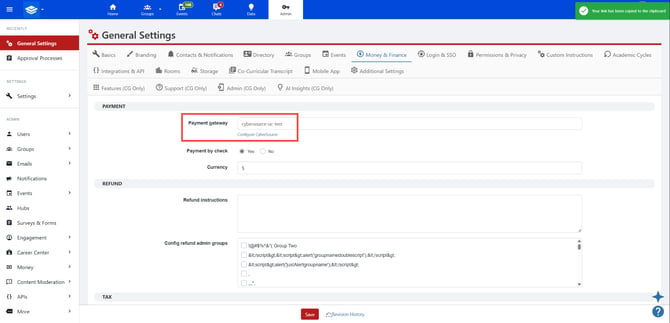
Click the Configure CyberSource link that now appears directly beneath the Payment gateway field.
Entering your merchant details
The CyberSource Unified Checkout dialog opens. Under Merchant, enter your Merchant ID, then confirm Country and Locale are right for this institution. Country takes an ISO 3166 code (for example, US); Locale takes a language and region (for example, en_US). There's no currency field here — CG uses the currency set on this same Money & Finance tab.
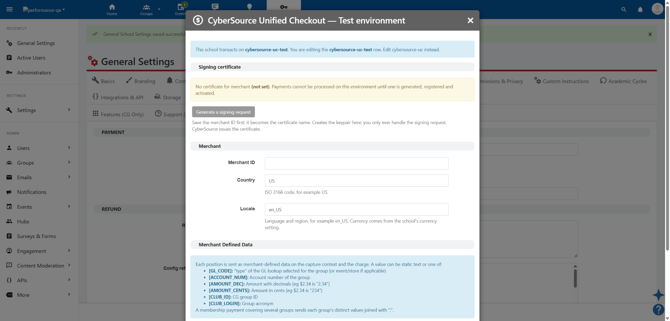
Click Save merchant settings.
⚠️ Caution: Save the merchant settings before you generate a signing request. The Merchant ID becomes the certificate's name, so generating first produces a certificate you'll have to redo.
Generating the signing request
Under Signing certificate, click Generate a signing request. CG creates the key pair and keeps the private key — you only ever handle the request itself, and Cybersource issues the certificate from it.
.png?width=670&height=322&name=Zight%202026-9-22%20at%203.10.50%20PM%20(1).png)
A text box appears containing the request. Copy its full contents, including the -----BEGIN CERTIFICATE REQUEST----- and -----END CERTIFICATE REQUEST----- lines.
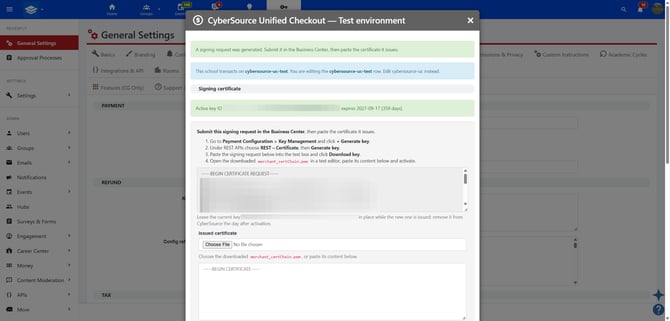
💡 Tip: Leave this dialog open in a second browser tab. You'll come back to it to upload the certificate, and closing it means re-navigating the whole clickpath.
Getting the certificate from the Cybersource Business Center
CG lists these four steps in the dialog itself, next to the request. They are reproduced here with the detail you'll need on the Cybersource side.
- In the Business Center, go to Payment Configuration > Key Management and click + Generate key. The button sits at the top right of the Key Management page.
- On the Create Key page, under REST APIs, select REST - Certificate, then scroll to the bottom and click Generate key.
REST - Shared Secretis selected by default, so you have to change it — a shared secret won't work for Unified Checkout. - On the Key Generation page, paste your signing request into the Public PEM formatted certificate (optional) box, then click Download key. Pasting the request is what ties the issued certificate to the key pair CG already holds. Leave Certificate Expiry Timeframe at its default unless your institution has a reason to change it.
- Keep the downloaded
.pemfile. It's named after your Merchant ID, ending in_certChain.pem.
Activating the certificate in CampusGroups
Back in the CyberSource Unified Checkout dialog, find the Issued certificate section. You can provide the certificate either way:
- Click Choose File and select the downloaded
_certChain.pemfile. - Or open the file in a text editor and paste its contents into the text box below.
.png?width=670&height=322&name=Zight%202026-9-22%20at%203.16.55%20PM%20(1).png)
Click Activate.
The Signing certificate section now shows an active key ID and an expiry date, and the button changes to Generate a replacement signing request.
⚠️ Caution: After activating, CG advises removing the previous key from the Business Center the following day. Don't delete it the same day.
Testing the connection
Before handing the environment over, put a real charge through it. Open a group event with a paid registration option, register, and choose a paid item.
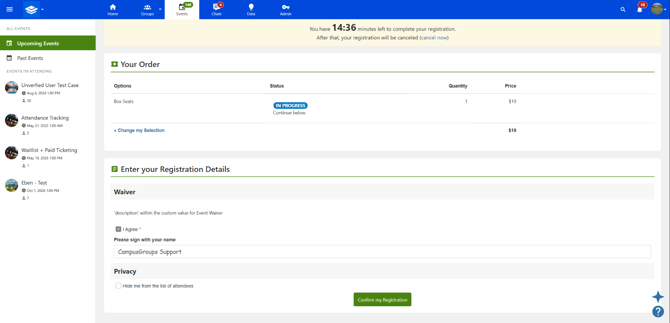
On the Payment page, the embedded Unified Checkout form asks for an email address, then card and billing details.
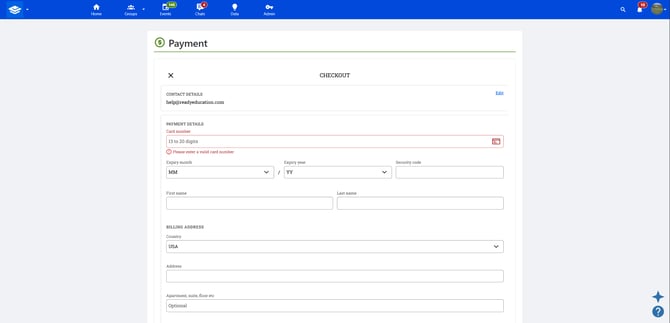
Confirm the payment. A successful transaction returns the You're registered! confirmation with the order marked PAID.
ℹ️ Note: To test payments, use Cybersource's published test card numbers — not a real card.
Renewing the certificate
The certificate expires. CG shows the expiry date next to the active key ID, so check it before it lapses. To renew, reopen the CyberSource Unified Checkout dialog, click Generate a replacement signing request, and work through the same Business Center exchange.
⚠️ Caution: Payments stop processing on an environment once its certificate expires. Renew ahead of the date rather than on it.